


What are finite state machines?
A description of the behavior of a system and how it changes over time. David Khourshid
The animation above was made with React, Styled Components, and XState/React for state management.
Defining a state machine can be verbose. I find it best to describe it with an example. Remember that state machines don't remove complexities, but they force you to rethink how you build your applications. Your approach will be much more purposeful.
Let's say we have a smart light bulb, and I ask you to take a second and list all of the states you think this lightbulb can be in; I'll start by listing my initial thoughts.
- The lightbulb can be Off
- The lightbulb can be On
- The lightbulb can be many different colors
- The lightbulb can be Brightened
- The lightbulb can be Dimmed
- The light can be Broken
Your list may be a bit different than mine, but you get the idea here. Can you spot the commonality in our example? It's that our light bulb can only be in one state at a time (more on this later). If our lightbulb is on, its behavior would be different if you try and dim the lightbulb if it were off.
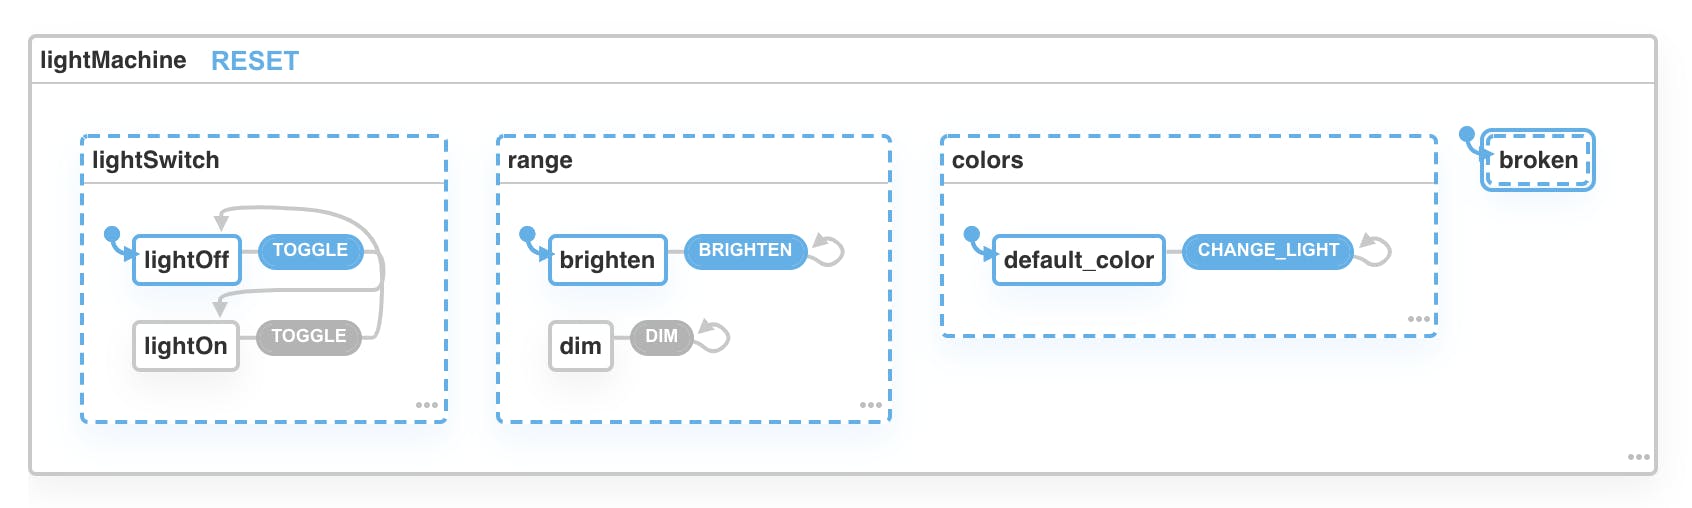
Without realizing it, we just created a state machine. Our "Machine" is declarative and easily understood. Using XState's visualizer tool, this is our current state.

I touched on earlier that our UI will react differently depending on its current state. When our light is on, it can also be dimmed, brightened, or color changed. This means we can further break down our states and compartmentalize related states. These are known as parallel state nodes, "the states are not directly dependent on each other, and no transitions should exist between parallel state nodes."
We now have a lightSwitch node, a range node, a colors node, and a broken state node. These nodes will operate independently of each other. Turning on our lights will not affect their brightness level. Changing the color of our lights can't inadvertently turn them off. Essentially our states can co-exist without affecting one another.
We can now start building our UI in isolation since we know all of our lightbulb states. We'll start building our "On"/"off" logic. At its very basic, our smart bulb can either be on or off. We can imagine using a toggle switch to turn our lights on and off. This "TOGGLE" (onClick) event gets sent to our state machine, causing our machine to transition between its current state and the next state.
export const lightMachine = createMachine({
  id: "lightMachine",
  initial:"lightOff",
  states:{
    lightOff:{
      on: {
        TOGGLE: {target:"lightOn"}
      }
    },
    lightOn:{
      on: {
        TOGGLE: {target:"lightOff"}
      }
    }
  }
});
If you're familiar with the useState hook, XState's useMachine hook works similarly. The useMachine hook takes machine an object to be passed in. We can use the same destructuring pattern to pull out a state object and an updater function.
import lightMachine from './lightMachine'
const [current, send] = useMachine(lightMachine,);
The current object returns a few properties we can leverage to display our UI elements. We can use the current.matches(value)(boolean) method to display the UI the user expects when the "TOGGLE" even occurs.
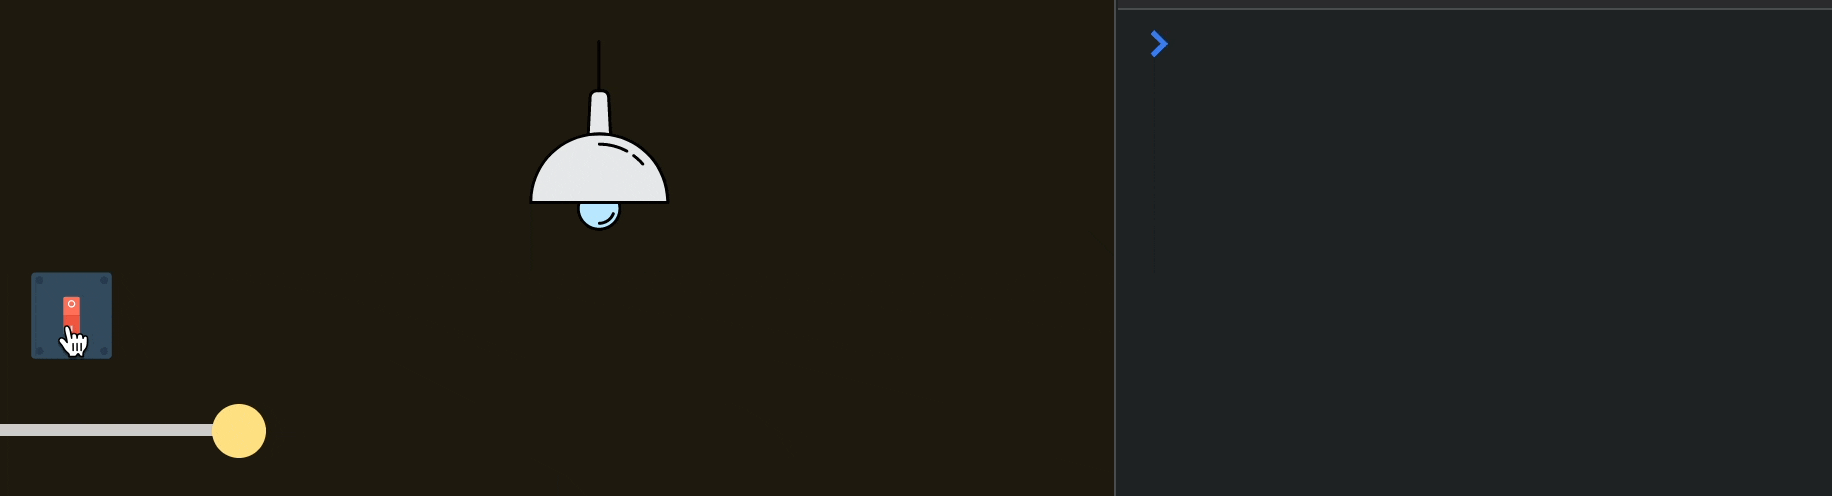
The animation below show's a switch being clicked. The click event sends the "TOGGLE" event to our machine, and if you remember "TOGGLE" event turns our light on or off.
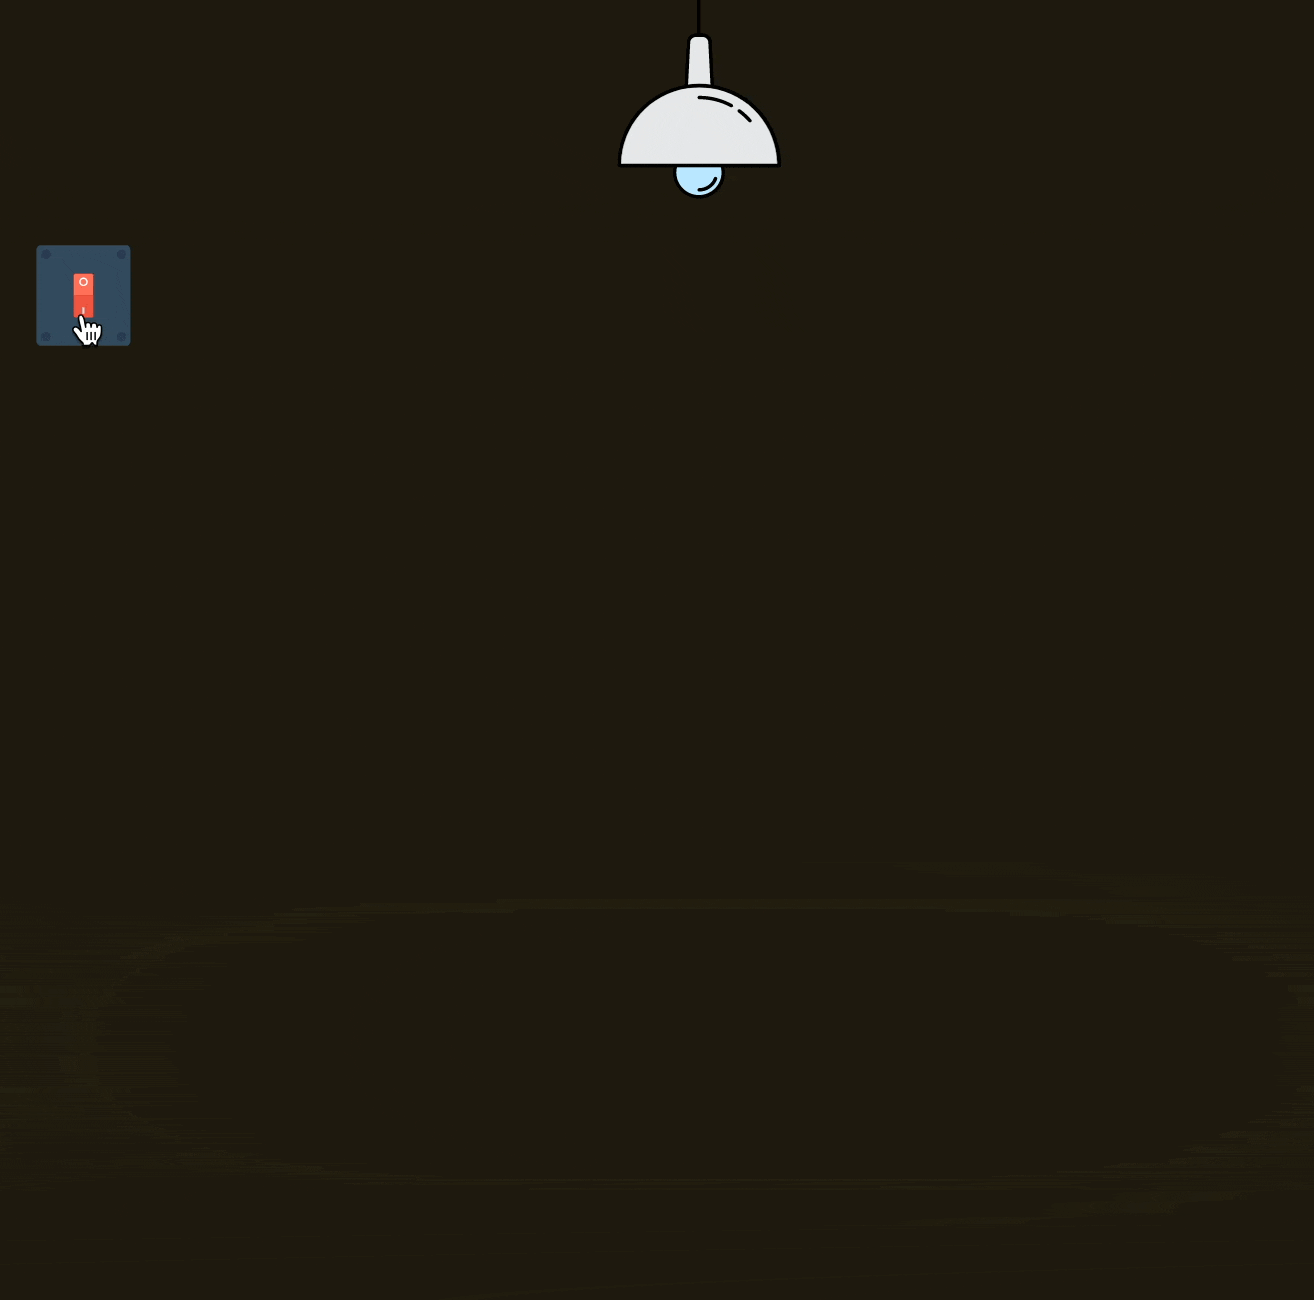
We use the current.matches({lightSwitch:"lightOff"}) to check if our current state is "lightOff". If true the Lamp component is displayed.
If current.matches({lightSwitch:"lightOn"}) is true, we render the same component, but this time we'll pass in the color of our lightbulb via props.
{current.matches({ lightSwitch: "lightOff" }) && <LightSvg />}
{current.matches({ lightSwitch: "lightOn" }) && (
  <LightSvg lightColor={`hsla(46, 99%, 75%, 1.00))`} />
)}
You may have also noticed our switch also changes from green to red when clicked. We use the same technique to change the color of the switch. We check our machine's current state. Then we render the appropriate expected UI.
I achieved the blur effect by adding a data attribute to our HTML element. If you're unfamiliar with data attributes. Adding "data-anything" adds extra information to our HTML element. In this case, we can then use a CSS attribute selector to display some styles when our data-attribute matches our CSS selector.
//Data attributes example
<div
    className="blur"
    data-state={current.value.lightSwitch}>
</div>

.blur[data-state="lightOn"]{
    ...blur effect styles
}
// when our lightSwitch state === "lightOn" our blur
// effect is shown.  Otherwise nothing is rendered.
We've leveraged two properties from our current object to give life to our animation in a straightforward way. This is the beauty of finite state machines, in my opinion. We can build our Applications without surprises because we thought through our states before building our UI.
TOGGLE event
This is where the magic of XState happens. We created our state machine, built our UI around the current state, and finally, we can send our "TOGGLE" event to transition us between states with an event handler. For our transition, we use an onClick event.
<LightSwitch
    onClick={() => send({ type: "TOGGLE" })}
    data-state={event.current.lightSwitch}
/>
When our LightSwitch component registers a click event, we use our update function to transition us between states in our lightSwitch state node by sending the "TOGGLE" event.
Dimmer Slider
We use an input with a type of range to simulate dimming and brightening our lights. As we slide the thumb, the value of the input changes. We will then grab that value with an event handler and save it in our state machine.
Before we can continue, we need to discuss extended states. These are states that can't be predefined in our state machine. In our example, it's impossible to know where the user will position our slider beforehand. These are extended states. In XState, an extended state is called context.
const lightMachine = createMachine({
    id:"lightMachine",
    context:{
        // Represents the default value of our state for our dimmer slider
        rangeValue:99;
    },
states:{
        lightSwitch: {
            //...
        }
    },
range:{
        initial:"brightness_level",
        states:{
            on:{
                CHANGE:{
                    //The assign() action is used to update the machine's context
                    actions: assign:({
                        // context: current context of our machine
                        // event: events payload value, replaces the current value of context
                        rangeValue:(context, event) => event.value
                    })
                }
            }
        }
    }
})
Our dimmer slider is an Input element with the type of range. We'll need to add the "max/min" attributes to our input (min=0, max=99). Our input's value attribute will come from our context state. We can access our context from our current object.
const {rangeValue} = current.context; // 99

<Range
    type="range"
    min="0"
    max="99"
    value={rangeValue}
 />
Let's take a closer look at our range state. We've combined our brightness/dimmed state's into one state called brightness_level. Our "CHANGE" event's payload is the current value of our input type range.
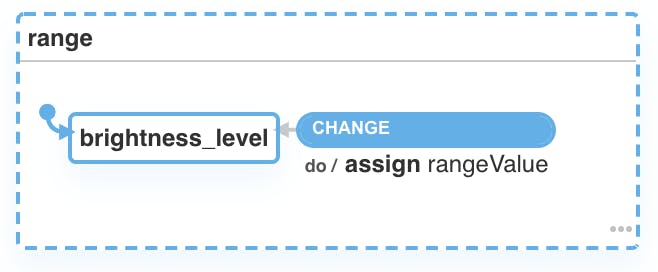
Our range state node has a single state that transitions back to itself on every fired event. Every time our range thumb is moved, an event is fired, its payload updates the current context.
We will use a change handler function to grab the input's current value and update our context.
<Range
    type="range"
    min="0"
    max="99"
    value={rangeValue}
        onChange={(e) => send("CHANGE", { value: e.target.value })}
        //We send the "CHANGE" arguement and a payload (the value of our input)
 />
Take a closer look at the gif below. You'll notice the glow behind the light dims when the range thumb is moved to the left. We'll use some more data attributes here to simulate a dimming effect with CSS.
The dimming effect can be accomplished in several ways. Since this demo uses Styled-Components, we pass in the color of our drop shadow as a prop in our component. Styled-Components give us access to our component's props within our style declarations.
const {rangeValue} = current.context; // 99

const LampSVG = styled.div`
  position: relative;
  &[data-state="lightOn"] {
    filter: ${(props) => props.dropShadow};
  }
`;

<LampSVG
    dropShadow={`drop-shadow hsla(46, 99%, 75%, .${rangeValue})`}
  >
</LampSVG>
Our drop shadow color is passed in as hsla function. Our alpha value is dynamic. By default, it's set to .99, almost fully opaque. The lower the value of our range, the lower the value of the opacity of our drop shadow. If it's set to zero, it'll be fully transparent. Set it to .99. It'll be fully opaque.
This technique is more advanced because it involves CSS and Styled Components, but its "effects" are predictable.
Color Change
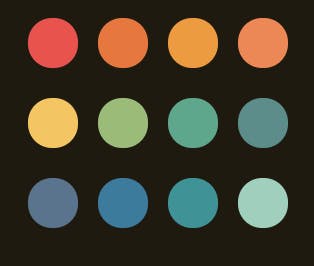
Changing colors is a bit more complex to implement, so we'll take a 30,000-foot view of how I implemented this logic. We have a color grid with 12 individual components. We pass in an HSLA color value to change its color. When a color is clicked, an onClick event occurs.
<Circles
   onClick={() => send("CHANGE_LIGHT", { value: "159, 41%, 70%" })}
   color="hsla(159, 41%, 70%, 1.00)"
 />
Its HSLA color value is saved in our context object. Also, the "CHANGE_LIGHT" event is triggered. Our Lamp and Light effect components have been updated to get their color from the context object. Our context object has also been updated to store the current color, which gets updated when one of the colors in the grid is clicked on.
The wonderful part of our state machine is that our state nodes work seamlessly without affecting each other. We can now turn on our lights, change colors, dim, turn off our lights, and everything works.
Conclusion
I admit state machines are complicated and have a pretty steep learning curve, but it's worth learning. Thinking about your logic before you build out your components leads to fewer bugs and predictable visual states. I encourage you to try building a component using XState. Once you get past the learning curve you'll never look back.