Subtle Animations with XState and Styled-Components for the win
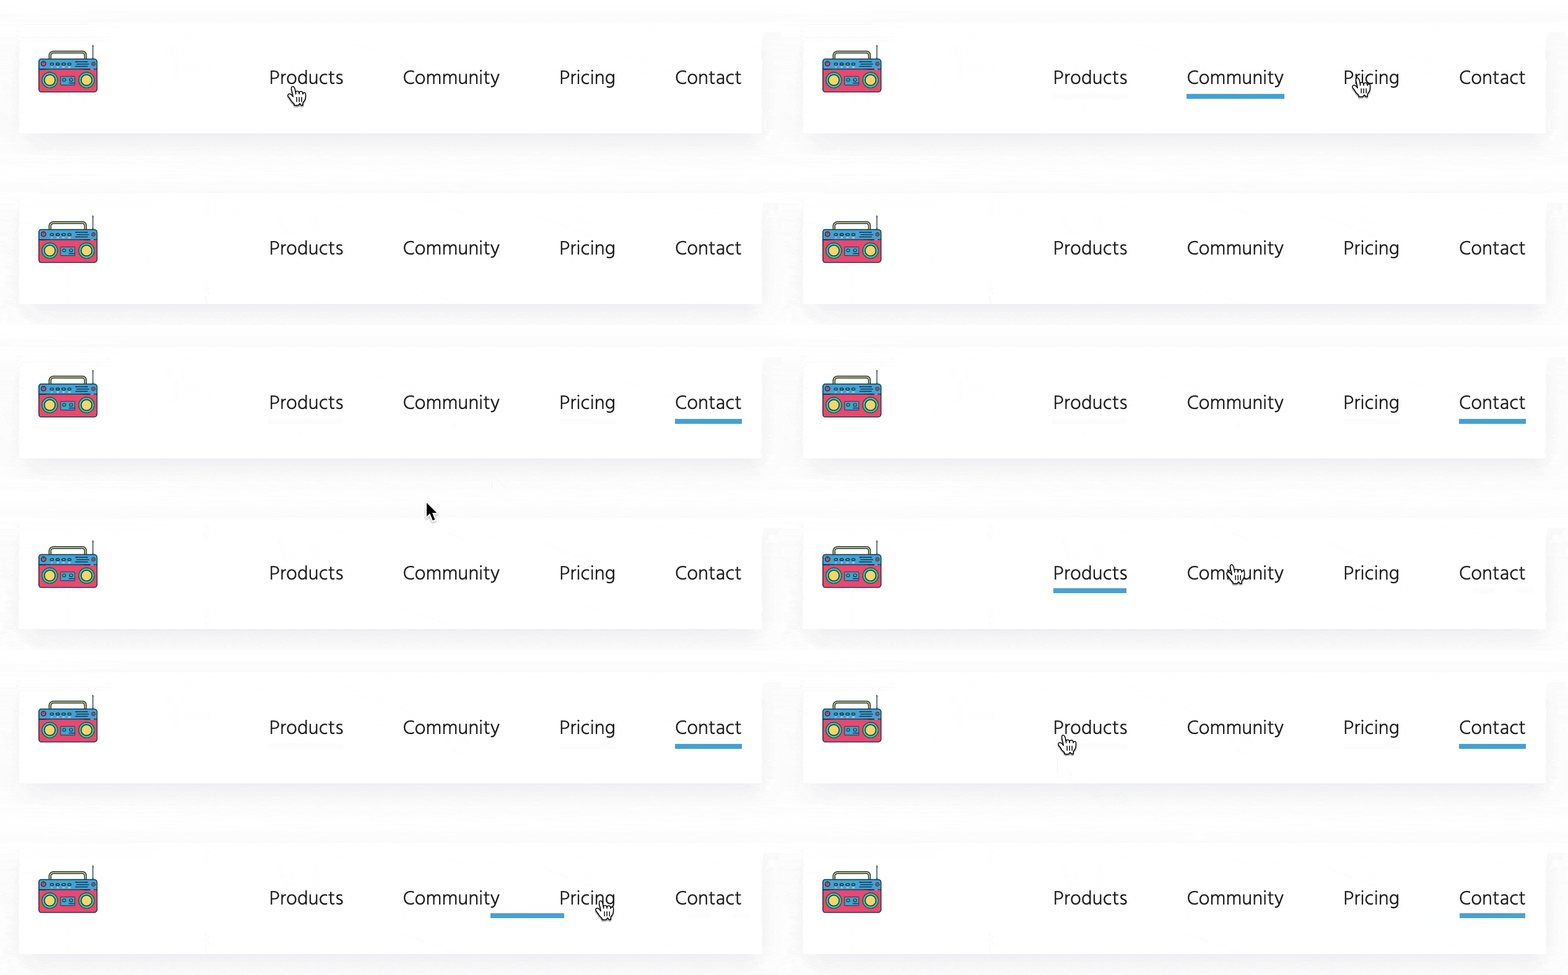
Take a look at these two navigation menus, they're both identical but one is just more pleasant to use, and if you're not paying close attention you may not even notice the subtle difference. These UI designs choices add a bit of "whimsy" and polish to your web apps and keep your users engaged longer.

We'll break down how to create this animation using React, Styled Components, and XState.
This walkthrough assumes a bit of CSS, React, and XState/React experience.
Creating our Menu
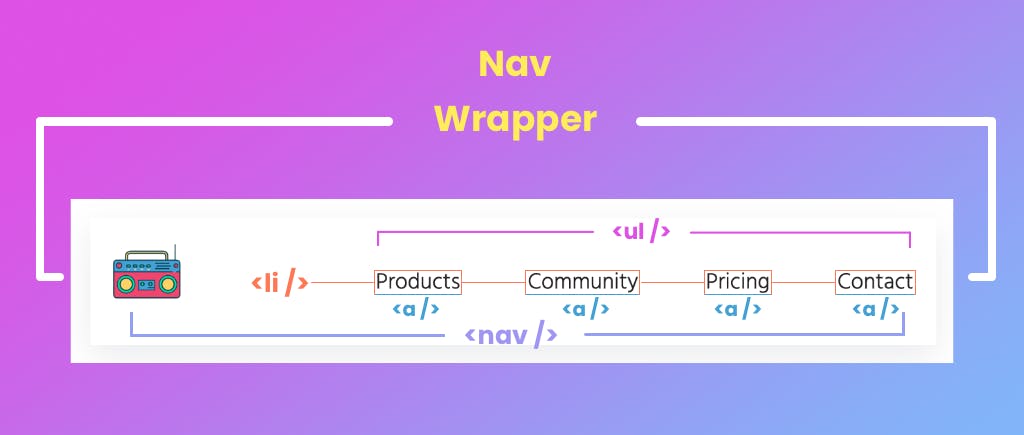
We'll use Styled Components to build our menu. We'll start with our outer wrapper, followed by a nav element, an unordered list, list items, and anchors.
Let's break down the image above. We have an outer wrapper with a display of flex, centering our logo, and nav element and its children. We use space-between to push both elements away from each other. The rest is straightforward, an unordered list, with list items, and anchors as their children. (We wont discuss much styling here)
Let's start with our first navigation. In order to accomplish the underline when the link is clicked, we'll use reacts useState hook, and add a data attribute to each anchor. If you're unfamiliar with HTML
data-attributes , data-*="value" allows us to add a bit of extra information to our elements. We can then style our anchor tags when a data-attribute matches its value in CSS. The logic breaks down as follows.
- Create a function to return the inner text of each element.
- Import and implement the useState hook.
- Add a click even to each Styled Component Anchor Element.
- Use useState hook to and save the value of our inner text.
- Check if data-attribute matches the anchor element, if it does set its data-attribute to our current state.
- style link that is clicked on "active" with a border-bottom.
Let's step through our pseudo code.
- Create a function to return the inner text of each element.
// This function expects an event argument, we use the event to grab
// our anchor's inner text, and make sure each letter
// returned is lower case.

  function getInnerText(e) {
    return e.target.innerText.toLowerCase();
  }
- Import and implement the useState hook.
import {useState} from 'react'
// I'm using null as the initial value intentionally, we will update
// to an anchors inner text, when it has been clicked on.
const [underLine, setUnderline] = useState(null)
We can group some of our logic.
- Add a click even to each Styled Component Anchor Element.
- Use useState hook to and save the value of our inner text.
The Anchor component is an <a> element created with Styled Components.
The onClick event updates our current state to "product"
<Anchor
    onClick={(e) => setUnderline(getInnerText(e))}
    href="#"
>
    Products
</Anchor>
- Add a data-attribute to our anchor element. It's value will be either
falseor "product" depending on our conditional logic.
If our current state is set to "product", our data-attribute value will be "products"
<Anchor
    data-state={underLine === "products" && "products"}
    onClick={(e) => setUnderline(getInnerText(e))}
    href="#"
>
    Products
</Anchor>
Add data-attribute styling to our styled-component, if it's data-attribute value matches what's in state, we can add a border-bottom to our anchor tag.
const Anchor = styled.a`
color: hsla(319, 7%, 13%, 1);
text-decoration: none;

&[data-state="products"] {
  border-bottom: solid hsla(201, 64%, 55%, 1) 4px;
}
... //additional data-state styles
`
This implementation is pretty neat and totally acceptable. It accomplishes what we wanted, and also lets the user know where they are in our web apps. Let's go a bit further.
Adding a bit of Whimsy to improve our users' experience ever so slightly.
Surprisingly we don't have to change much of our code to accomplish this transition. We will need to add a div to replace our bottom-border indicator. We will also need to create our State Machine. Here's some logic we will need to work on.
-Create a div with an absolute position so it sits just outside of our NavWrapper component.
- We can then pass in some props to our Styled Component div.
- Those props will transition and scale our
div - Add our
NavigationHoverEffectcomponent to ourNavWrapper - Create our state machine to hold our hover effects "positioning" values.
Let's create our `div' and pass in some props.
const NavigationHoverEffect = styled.div`
  width: 10px;
  height: 4px;
  background-color: hsla(201, 63%, 55%, 1);
  position: absolute;
  top: 57px;
  right: -10px;
  transition: transform 500ms ease-in-out;
  transform: ${(props) =>
    `translateX(${props.translateX}px) scaleX(${props.scaleX})`};
`;
The first few style rules are easy to understand. Let's talk about the last two. The transition will make sure our div moves from each anchor tag "smoothly". We give it 3 properties, the transition property (transform) the transition duration (.5 seconds) and the timing function, and ease-in-out.
The transform rule takes 2 values, translateX() (moves left to right) and scaleX() will grow and shrink our div. We pass in the values via props. Those values will come from our state machine.
State Machines
In order for our div to move from one Anchor to another, we'll need to dynamically pass in values to our NavigationHoverEffect component. Let's walk through our logic again.
- Figure out the size and location of each Element
- When an Anchor element is clicked on, move the hover element underneith it.
- Send its "size" and "position" to via props to our hover element.
- Create a state machine to save each Anchor components "location".
- Update our extended state so our
divalways know's where it is.
We can leverage our developer tools to find our "location" and "size" of each Anchor element.

We do this for each Anchor element, once you're happy with the location and size, we'll save those values to our state machine.
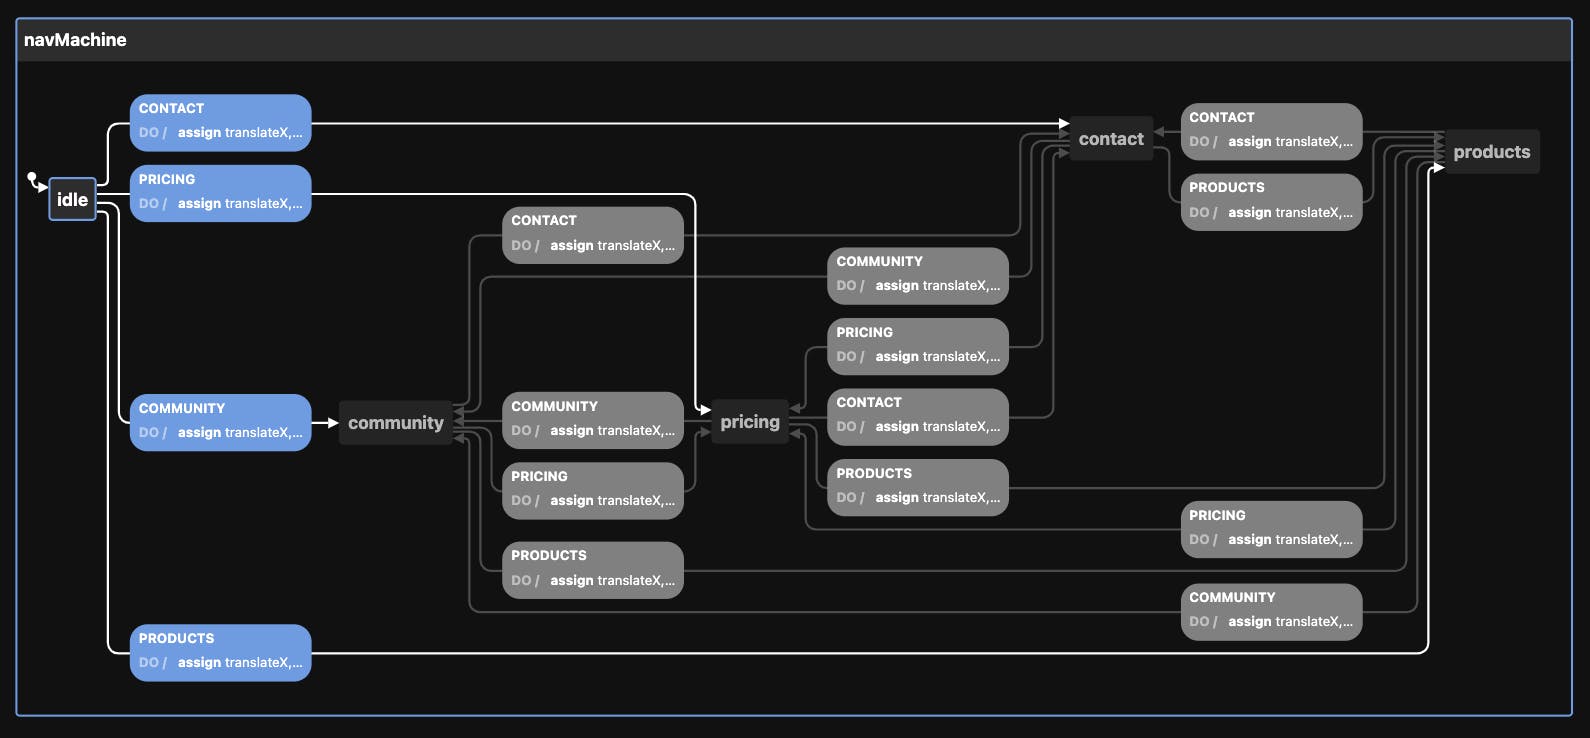
Let's create a state machine. It will have 5 states. Each state transition will update our extended states. We can use the extended state values to update the size and positioning of our div. The initial state idle will have the make sure our div sit's just outside of our nav wrapper. When you click on any Anchor tag, a click event will fire and it will update our context, those values are passed into our NavigationHoverEffect component via props and will cause our slider to move between Anchor tags.
There's a lot to digest here, let's start with our state machine.
Let's start by creating our state machine.

import { createMachine, assign } from "xstate";

const navMachine = createMachine({
  id: "navMachine",
  initial: "idle",
  context: {
    translateX: null,
    scaleX: null
  },
  states: {
    idle: {
      on: {
        PRODUCTS: {
          target: "products",
          actions: assign({ translateX: -373, scaleX: 5.9 })
        },
        COMMUNITY: {
          target: "community",
          actions: assign({ translateX: -255, scaleX: 7.7 })
        },
        PRICING: {
          target: "pricing",
          actions: assign({ translateX: -146, scaleX: 4.5 })
        },
        CONTACT: {
          target: "contact",
          actions: assign({ translateX: -48, scaleX: 5.3 })
        }
      }
    },
    products: {
      on: {
        COMMUNITY: {
          target: "community",
          actions: assign({ translateX: -255, scaleX: 7.7 })
        },
        PRICING: {
          target: "pricing",
          actions: assign({ translateX: -146, scaleX: 4.5 })
        },
        CONTACT: {
          target: "contact",
          actions: assign({ translateX: -48, scaleX: 5.3 })
        }
      }
    },
    community: {
      on: {
        PRODUCTS: {
          target: "products",
          actions: assign({ translateX: -373, scaleX: 5.9 })
        },
        PRICING: {
          target: "pricing",
          actions: assign({ translateX: -146, scaleX: 4.5 })
        },
        CONTACT: {
          target: "contact",
          actions: assign({ translateX: -48, scaleX: 5.3 })
        }
      }
    },
    pricing: {
      on: {
        PRODUCTS: {
          target: "products",
          actions: assign({ translateX: -373, scaleX: 5.9 })
        },
        COMMUNITY: {
          target: "community",
          actions: assign({ translateX: -255, scaleX: 7.7 })
        },
        CONTACT: {
          target: "contact",
          actions: assign({ translateX: -48, scaleX: 5.3 })
        }
      }
    },
    contact: {
      on: {
        PRODUCTS: {
          target: "products",
          actions: assign({ translateX: -373, scaleX: 5.9 })
        },
        COMMUNITY: {
          target: "community",
          actions: assign({ translateX: -255, scaleX: 7.7 })
        },
        PRICING: {
          target: "pricing",
          actions: assign({ translateX: -146, scaleX: 4.5 })
        }
      }
    }
  }
});
You'll notice that the states can transition between each other. When a transition happens our context values are updated. In order to make use of those values, we'll need to import the useMachine hook, and pass in our state machine. We can then use the current object to grab the current context value.
import {useMachine} from "@Xstate/React"
import {navMachine} from './navMachine'

const [current, send] = useMachine(navMachine)
We'll now need to create a helper function to grab our inner text values, this time we will need to make sure each character is capitalized.
  function getInnerText(e) {
    return e.target.innerText.toUpperCase();
  }
Now we will need to add an OnClick event to our anchor tags, the even will fire our send updater function and pass in a transition to our state machine.
<AnimatedAnchor href="#" onClick={(e) => send(getInnerText(e))}>
    Products
</AnimatedAnchor>
Lastly, we grab our state machines' context values and pass the values via props to our Styled component. Those props are used to dynamically update our div.
// The context Values passed in via props dynamically update our div!

<NavigationHoverEffect
    translateX={current.context.translateX}
    scaleX={current.context.scaleX}
/>
const NavigationHoverEffect = styled.div`
  width: 10px;
  height: 4px;
  background-color: hsla(201, 63%, 55%, 1);
  position: absolute;
  top: 57px;
  right: -10px;
  transition: transform 500ms ease-in-out;

  transform: ${(props) =>
    `translateX(${props.translateX}px) scaleX(${props.scaleX})`};
`;
That's it! We made it! With the use of state machines and styled-components we can really do some neat.

